The Correct Way to Install a CPU Without Bending Pins or Pads
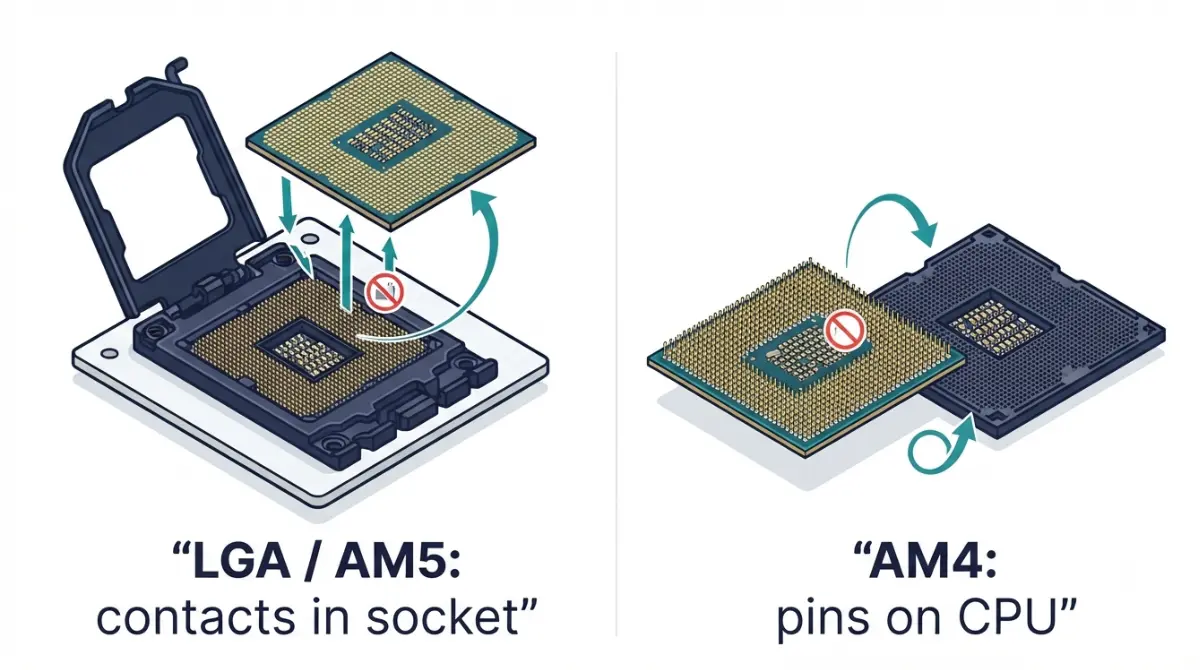
Table of Contents
Where the fragile pins are on your CPU platform
What you need to protect depends on your socket, not on how steady your hands are. Learning how to install a CPU without bending pins starts with one question: are the pins on the motherboard or on the chip?
- First build on Intel or AM5? Read the LGA steps below.
- Upgrading an AM4 system? Jump to the AM4 section.
- PC won’t boot after installing? Go to the troubleshooting section.
- Already spotted a bent pin? Go straight to the last section before touching anything.
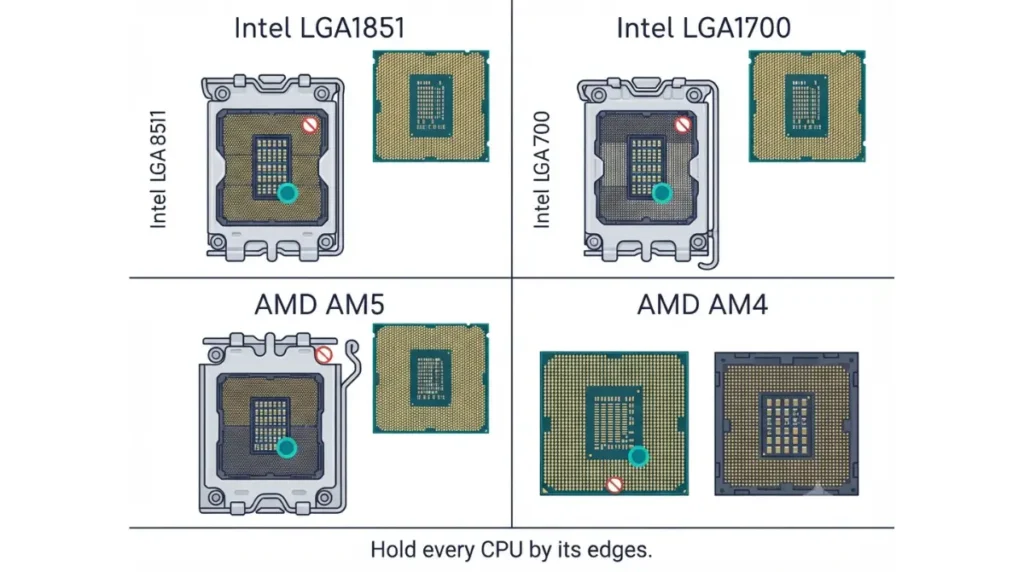
Intel LGA1851 and LGA1700: pins in the socket
Both are land grid array (LGA) sockets. The spring contacts sit in the motherboard, and the CPU’s underside carries flat gold pads.
AMD AM5: pins in the socket, pads on the CPU
ASRock’s AM5 platform guide confirms the pins moved from the CPU (AM4) to the socket (AM5). AM5 CPUs have pads, not pins.
AMD AM4: pins on the CPU
AM4 is a pin grid array (PGA) socket. The pins travel with the processor, so the chip itself is the fragile part.
| Platform | Pins live on | CPU underside | Riskiest moment → what to inspect | A bend damages |
|---|---|---|---|---|
| Intel LGA1851 | Motherboard | Flat pads | Lowering the chip → socket rows | Motherboard |
| Intel LGA1700 | Motherboard | Flat pads | Lowering the chip → socket rows | Motherboard |
| AMD AM5 | Motherboard | Flat pads | Lowering the chip → socket rows | Motherboard |
| AMD AM4 | CPU | Pins | Handling and removal → CPU pins | CPU |
Seating the CPU is the final step of a full motherboard compatibility checklist. Everything on that list has to be right before the lever moves.
ℹ️ Risk Note: A bent socket or CPU pin can permanently damage the motherboard or processor, and repairs may not be covered by warranty. If you find one, stop, don’t power the system on, and contact your retailer or the board or CPU maker’s support before attempting any fix.
Check these three things before you lift the lever
Most “bent pin” disasters start before installation, when the wrong chip meets the wrong socket.
Match the socket, not just the brand
Intel states that LGA1851 and LGA1700 are not interchangeable, even though both are Intel sockets. Confirm your CPU and board share a socket and a supported chipset before the box is even open.
Inspect the socket under angled light
Shine a flashlight across the socket at a low angle. The contacts should form even, uniform rows. Photograph the socket right after unboxing so you have a record of its condition.
Board out of the case or in it?
Both work. On a flat, static-safe surface you get better light and a straight-down sightline. If the board is already installed, ASUS says to disconnect the system’s power cord first.
How to seat an LGA CPU without touching the pins
On Intel LGA1851, LGA1700 and AMD AM5, a correctly aligned CPU seats under its own weight, with no pressure from you.
- Unplug the system and take static precautions, as Intel’s LGA1851 installation guide directs.
- Press the lever down and out, lift it, and open the load plate.
- Leave the plastic cover on if your board’s cover label says to install the CPU first.
- Align the CPU’s gold triangle with the socket’s corner marker, and the CPU’s notches with the socket’s tabs.
- Lower the chip vertically into the socket. Don’t press it.
- Close the load plate and lock the lever.
Orient the triangle and notc
The notches only line up one way. If the chip doesn’t sit flat, lift it straight up and re-check the alignment. Never nudge it sideways.
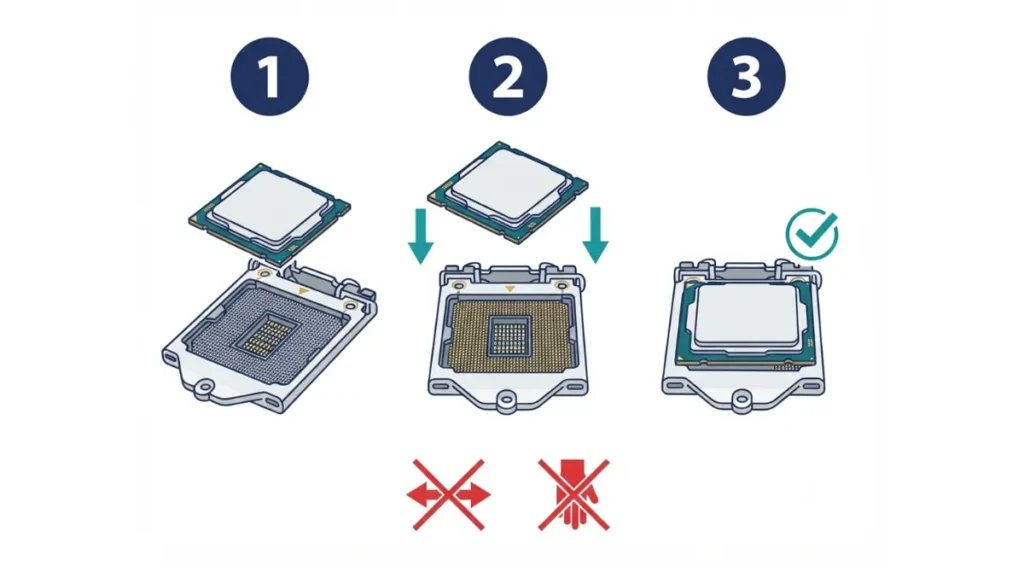
Lower it straight down with zero force
Hold the chip by its edges, level with the socket, and release it just above the contacts.
Close the load plate: which resistance is normal
Intel’s guide notes that lowering the lever may require some force. That force is normal. Force on the chip itself is not.
🔍 Why It Works: LGA sockets are zero-insertion-force designs. The chip needs no push to seat, and the lever only clamps the load plate onto an already-seated CPU. Pressing on the chip itself is what drives contacts sideways.
When the socket cover comes off, and why you keep it
Order varies by board. ASRock’s AM5 boards want the processor installed before the cover is removed, so follow the label printed on your cover. Intel’s guide for its older LGA1200 and LGA115x sockets says never to discard the cover and to put it back whenever the CPU is removed.
Installing an AM4 chip when the pins are on the CPU
AM4 is the previous-generation platform. On AM4 the pins are on the processor, so careful handling matters more than socket inspection.
Lever fully up before the chip goes near the socket
According to AMD’s community installation guide, the AM4 socket has 1,331 pin holes. Lift the retention lever all the way, align the triangles, and let the chip drop in. Then lower the lever.
Handling and setting down a pinned CPU
Hold the chip by its edges. Never rest it pins-down on a desk; put it back in its original packaging if you need to set it aside.
Removing an old AM4 chip safely
Take off the cooler exactly as its manufacturer’s instructions describe. Only then lift the lever and remove the chip.
Six handling mistakes that bend socket pins
Each of these mistakes goes against a specific manufacturer instruction.
Mistakes during placement
| Mistake | Platform | Why pins bend | Manufacturer instruction that prevents it |
|---|---|---|---|
| Lowering at an angle | All | A corner lands on contacts first | ASUS: place the CPU vertically |
| Sliding to find alignment | All | Lateral drag across contacts | ASUS: align triangle and notches first |
| Removing the cover early | Some AM5 boards | Contacts left exposed | ASRock: install CPU before removing cover |
| Forcing a wrong-socket CPU | All | Mismatched package crushes contacts | ASUS: check the socket spec first |
Mistakes after seating
| Mistake | Platform | Why pins bend | Manufacturer instruction that prevents it |
|---|---|---|---|
| Forcing a resisting lever | All | A misaligned chip is clamped into contacts | Intel: little force should be needed |
| Losing the socket cover | LGA | Socket left unprotected later | Intel: keep it and replace it if the CPU is removed |
How to tell if a pin bent during install
A failed boot after installation has several possible causes, and a bent pin is only one of them.
Warning signs while closing the lever
If the lever needs noticeably more force than your manual describes, stop. Reopen the socket and check the alignment before trying again.
Signs after first power-on
A damaged contact can show up as a failure to boot or as hardware the board doesn’t detect. Those same symptoms have other causes too, so check them first.
Causes that aren’t a bent pin
A board can need a BIOS update before it recognizes a newer CPU. For example, ASRock lists BIOS 3.30 as the minimum for its AM5 boards to support Ryzen 9000 chips such as the 9700F. Check the BIOS version your board needs for your CPU, and rule out a memory compatibility issue.
✅ Do This: Power off and unplug, then open the socket and look at it under angled light. Inspect only; don’t touch the contacts. If any look out of line, go to the next section.
Bent a pin? Do this before you try to fix it
What you do in the next hour affects your return and warranty options more than anything else.
Stop, photograph, don’t power on
Photograph the damage clearly. On LGA boards, refit the socket cover.
Retailer return window vs manufacturer warranty
Start with the retailer if you’re still inside the return window. Warranties commonly exclude physical damage, so read your manufacturer’s exact terms before shipping anything.
Where to get it assessed
Contact the maker of the damaged part (the board maker for LGA, the CPU maker for AM4) or a qualified repair shop. Ask for an assessment and a repair quote.
⚠️ Watch Out: This guide deliberately gives no pin-straightening steps. A failed attempt can break a contact off entirely and make repair impossible. Get it assessed first.
FAQ
1. Are the pins on AM5 CPUs or motherboards?
On AM5, the pins sit in the motherboard socket. AM5 CPUs have flat pads on the underside instead of pins.
2. Does AM4 have pins on the CPU?
Yes. AM4 is a pin grid array socket, so the pins are on the processor. Handle it by the edges and never set it pins-down.
3. Is it normal for the CPU lever to be hard to close?
Some lever resistance is normal. If it takes far more force than the manual describes, reopen the socket and check the alignment.
4. Do I remove the CPU socket cover first?
It depends on your board. Follow the label printed on the cover. ASRock AM5 boards install the CPU before the cover comes off.
5. How much force does it take to seat a CPU?
None. A correctly aligned CPU seats under its own weight; only the lever needs force.
6. Can I reuse the socket cover?
Yes, and you should keep it. Intel says to refit the cover whenever the CPU is removed from the socket.
7. Should I install the CPU before putting the motherboard in the case?
Either works. On a flat surface outside the case, you get better light and a clearer straight-down view of the socket.
8. Can a bent pin stop a PC from booting?
It can, but an outdated BIOS or incompatible RAM causes the same symptoms. Rule those out first, then contact the board maker’s support.
9. Does warranty cover bent socket pins?
Often not, since warranties commonly exclude physical damage. Check your manufacturer’s official warranty terms and contact the retailer first.
10. Should I straighten a bent pin myself?
Not before an assessment. A failed attempt can break the pin off. Contact the part maker’s support or a qualified repair shop.
Seat it once, gently, and move to the cooler
Three rules prevent nearly every bend: know where your platform’s pins are, let the chip drop in with zero force, and keep the socket cover. If anything looks wrong, stop and contact the retailer or manufacturer before attempting a fix. Once the chip is seated, check your cooler fits the socket and clears your RAM.